Monday, June 1, 2015

Oracle Database 12c : Install & Configure with Response Files

It is very easy to install the database software and create a database instance by running the GUI installer.  But if you are not a GUI fan, you can install & configure your database with response files.

Here I will give you a small overview of the steps that can be done.
All these steps were executed on an Oracle Linux 6 host.

(1)
Prepare your environment to install an Oracle 12c database:
[root@ol6db ~]$ yum install oracle-rdbms-server-12cR1-preinstall

(2)
Download the zipped installers and copy them to your database machine.

(3)
Unzip the installers.

(4)
In the database/response directory, there are 3 types of response files:

  • dbca.rsp : Silent installation of Database Configuration Assistant
  • db_install.rsp : Silent installation of Oracle Database 12c software + option to configure a database instance and listener
  • netca.rsp : Silent installation of Oracle Net Configuration Assistant


(5)
Copy the desired response files to the Oracle home directory and give it the right permissions.

[oracle@ol6db ~]$ cp /u01/software/database/response/*.rsp .
[oracle@ol6db ~]$ chmod 700 *.rsp


(6)
First, we will install only the database software.
Open the file db_install.rsp and fill in the appropriate parameters.  To install only the software, it is important that you give this parameter value:

oracle.install.option=INSTALL_DB_SWONLY

Go to directory where the unpacked installer resides and execute the silent installer.

[oracle@ol6db ~]$ cd /u01/software/database
[oracle@ol6db database]$ ./runInstaller -silent -noconfig -responseFile /home/oracle/db_install.rsp

At the end, you will be asked to execute some additional small scripts.  Please execute them.

Optionally, you can define some values for general system variables, like ORACLE_HOME, ORACLE_BASE, PATH etc.


(7)
Now we will configure the database listener.
Open the file netca.rsp and verify the appropriate parameters.
Execute netca with the response file:

[oracle@ol6db ~]$ netca -silent -responsefile /home/oracle/netca.rsp


(8)
We have the software, our listener is up and running, so we can now create or database instance.
Open the file dbca.rsp and configure the appropriate parameters.
Execute dbca with the response file:

[oracle@ol6db ~]$ dbca -silent -responseFile /home/oracle/dbca.rsp


(9)
Now try to login into the database with the necessary coordinates and credentials.


Saturday, May 23, 2015

High Availability : Setup UCarp on your Oracle Linux machines

Goal

Setup of multiple (in this case 2) Oracle Linux servers in a cluster with a virtual IP (VIP).  The intention is that the VIP is always active on exactly one server machine.
  • Primary IP of the first machine "ol6a": 192.168.56.121
  • Primary IP of the second machine "ol6b": 192.168.56.122
  • Virtual IP: 192.168.56.120 with linked hostname "ol6"
Apache is installed on both machines.  When navigating to the default page, the document root is shown.


Installation / Configuration steps on both machines


In the “/root” directory, create a start and a stop script that will be executed when the virtual ip defined by ucarp comes up or goes down.

# more /root/vip_up.sh
#!/bin/sh
exec 2>/dev/null
# Enable VIP on host
/sbin/ip addr add "$2"/24 dev "$1"
# Refresh MAC address on gateway
/sbin/arping -c 5 -A $2 -I $1
/sbin/arping -c 5 -U $2 -I $1
# Write to logfile
echo "up:" >> /root/vip.txt
date >> /root/vip.txt

# more /root/vip_down.sh
#!/bin/sh
exec 2>/dev/null
# Remove VIP from host
/sbin/ip addr del "$2"/24 dev "$1"
# Write to logfile
echo "down:" >> /root/vip.txt
date >> /root/vip.txt

# chmod u+x vip*sh


In the “/home/tom” directory, create a “down” and “up” log script.

# su - tom

$ more log_up.sh
#!/bin/sh
echo "up:" >> /home/tom/vip.txt
date >> /home/tom/vip.txt

$ more log_down.sh
#!/bin/sh
echo "down:" >> /home/tom/vip.txt
date >> /home/tom/vip.txt

$ chmod u+x log*sh


Install UCarp through YUM via the EPEL repository:

# yum install ucarp


Check the config files:

# ls /etc/ucarp/
vip-001.conf.example  vip-common.conf

# more /etc/ucarp/vip-common.conf
# Common VIP settings which can be overridden in individual vip-<nnnn>.conf
PASSWORD="love"
BIND_INTERFACE="eth0"
SOURCE_ADDRESS=""

# If you have extra options to add, see "ucarp --help" output
OPTIONS="--shutdown --preempt"


Verify that the ucarp service is down:

# service ucarp status
ucarp is stopped


Installation / Configuration steps on the first machine

Change the general “vip-common.conf” file:

[root@ol6a ~]# more /etc/ucarp/vip-common.conf
# Common VIP settings which can be overridden in individual vip-<nnnn>.conf
PASSWORD="MyPwd1"
BIND_INTERFACE="eth0"
SOURCE_ADDRESS="192.168.56.121"

# If you have extra options to add, see "ucarp --help" output
OPTIONS="--shutdown --preempt"


Create an appropriate config file:

[root@ol6a ~]# more /etc/ucarp/vip-ol6.conf
ID=001
BIND_INTERFACE="eth0"
SOURCE_ADDRESS="192.168.56.121"
VIP_ADDRESS="192.168.56.120"
PASSWORD="MyPwd1"
UPSCRIPT=/root/vip_up.sh
DOWNSCRIPT=/root/vip_down.sh
OPTIONS="--shutdown --preempt --advbase 10"


Check the current data for the “eth0” interface:

[root@ol6a ~]# ip addr sh eth0
2: eth0: <BROADCAST,MULTICAST,UP,LOWER_UP> mtu 1500 qdisc pfifo_fast state UP qlen 1000
    link/ether 08:00:27:7b:6a:3f brd ff:ff:ff:ff:ff:ff
    inet 192.168.56.121/24 brd 192.168.56.255 scope global eth0
    inet6 fe80::a00:27ff:fe7b:6a3f/64 scope link
       valid_lft forever preferred_lft forever


Installation / Configuration steps on the second machine

Change the general “vip-common.conf” file:

[root@ol6b ~]# more /etc/ucarp/vip-common.conf
# Common VIP settings which can be overridden in individual vip-<nnnn>.conf
PASSWORD="MyPwd1"
BIND_INTERFACE="eth0"
SOURCE_ADDRESS="192.168.56.122"

# If you have extra options to add, see "ucarp --help" output
OPTIONS="--shutdown --preempt"


Create an appropriate config file:

[root@ol6b ~]# more /etc/ucarp/vip-ol6.conf
ID=001
BIND_INTERFACE="eth0"
SOURCE_ADDRESS="192.168.56.122"
VIP_ADDRESS="192.168.56.120"
PASSWORD="MyPwd1"
UPSCRIPT=/root/vip_up.sh
DOWNSCRIPT=/root/vip_down.sh
OPTIONS="--shutdown --preempt --advbase 10"


Check the current data for the “eth0” interface:

[root@ol6b ~]# ip addr sh eth0
2: eth0: <BROADCAST,MULTICAST,UP,LOWER_UP> mtu 1500 qdisc pfifo_fast state UP qlen 1000
    link/ether 08:00:27:d1:09:96 brd ff:ff:ff:ff:ff:ff
    inet 192.168.56.122/24 brd 192.168.56.255 scope global eth0
    inet6 fe80::a00:27ff:fed1:996/64 scope link
       valid_lft forever preferred_lft forever


Test Process

(1)
On the first machine, start the ucarp service:

[root@ol6a ~]# service ucarp start
Starting common address redundancy protocol daemon:        [  OK  ]


(2)
Check if the VIP becomes active on this host:

[root@ol6a ~]# ip addr sh eth0
2: eth0: <BROADCAST,MULTICAST,UP,LOWER_UP> mtu 1500 qdisc pfifo_fast state UP qlen 1000
    link/ether 08:00:27:7b:6a:3f brd ff:ff:ff:ff:ff:ff
    inet 192.168.56.121/24 brd 192.168.56.255 scope global eth0
    inet 192.168.56.120/24 scope global secondary eth0
    inet6 fe80::a00:27ff:fe7b:6a3f/64 scope link
       valid_lft forever preferred_lft forever

=> OK


Check the logfile populated by the “up” script:

[root@ol6a ~]# more /root/vip.txt
down:
Sat Feb 21 11:55:14 CET 2015
up:
Sat Feb 21 11:55:52 CET 2015

=> OK, note that the first logging comes from the “down” script


(3)
On the second machine, start the ucarp service as well:

[root@ol6b ~]# service ucarp start
Starting common address redundancy protocol daemon:        [  OK  ]


(4)
The VIP doesn’t have to come up on this host:

[root@ol6b ~]# ip addr sh eth0
2: eth0: <BROADCAST,MULTICAST,UP,LOWER_UP> mtu 1500 qdisc pfifo_fast state UP qlen 1000
    link/ether 08:00:27:d1:09:96 brd ff:ff:ff:ff:ff:ff
    inet 192.168.56.122/24 brd 192.168.56.255 scope global eth0
    inet6 fe80::a00:27ff:fed1:996/64 scope link
       valid_lft forever preferred_lft forever

=> OK, the VIP is not active here


(5)
Navigate to the the Apache web page through the hostname linked to the VIP and check if the web page is accessible.


(6)
Stop the ucarp service on the first machine:

[root@ol6a ~]# service ucarp stop
Stopping common address redundancy protocol daemon:        [  OK  ]


An extra “down” message must be added tot the logfile:

[root@ol6a ~]# more /root/vip.txt
down:
Sat Feb 21 11:55:14 CET 2015
up:
Sat Feb 21 11:55:52 CET 2015
down:
Sat Feb 21 11:58:12 CET 2015

=> OK


Check if the VIP becomes active on the second host machine:

[root@ol6b ~]# ip addr sh eth0
2: eth0: <BROADCAST,MULTICAST,UP,LOWER_UP> mtu 1500 qdisc pfifo_fast state UP qlen 1000
    link/ether 08:00:27:d1:09:96 brd ff:ff:ff:ff:ff:ff
    inet 192.168.56.122/24 brd 192.168.56.255 scope global eth0
    inet 192.168.56.120/24 scope global secondary eth0
    inet6 fe80::a00:27ff:fed1:996/64 scope link
       valid_lft forever preferred_lft forever

=> OK


Check the logfile on the second machine and verify if there is an extra “up” message:

[root@ol6b ~]# more /root/vip.txt
down:
Sat Feb 21 11:56:31 CET 2015
up:
Sat Feb 21 11:58:42 CET 2015
=> OK


(7)
Refresh the webpage: you should see now the content of the second web server.


(8)
Stop all ucarp services on both machines.

Change the scripts “vip_up.sh” and “vip_down.sh” to execute the log script by user “tom”:

[root@ol6a ~]# tail -4 vip_up.sh
# Write to logfile
# echo "up:" >> /root/vip.txt
# date >> /root/vip.txt
su - tom -c /home/tom/log_up.sh
[root@ol6a ~]# tail -4 vip_down.sh
# Write to logfile
# echo "down:" >> /root/vip.txt
# date >> /root/vip.txt
su - tom -c /home/tom/log_down.sh

[root@ol6b ~]# tail -4 vip_up.sh
# Write to logfile
# echo "up:" >> /root/vip.txt
# date >> /root/vip.txt
su - tom -c /home/tom/log_up.sh
[root@ol6b ~]# tail -4 vip_down.sh
# Write to logfile
# echo "down:" >> /root/vip.txt
# date >> /root/vip.txt
su - tom -c /home/tom/log_down.sh


(9)
Start again the ucarp service on the first machine only:

[root@ol6a ~]# service ucarp start
Starting common address redundancy protocol daemon:        [  OK  ]


Check the IP config:

[root@ol6a ~]# ip addr sh eth0
2: eth0: <BROADCAST,MULTICAST,UP,LOWER_UP> mtu 1500 qdisc pfifo_fast state UP qlen 1000
    link/ether 08:00:27:7b:6a:3f brd ff:ff:ff:ff:ff:ff
    inet 192.168.56.121/24 brd 192.168.56.255 scope global eth0
    inet 192.168.56.120/24 scope global secondary eth0
    inet6 fe80::a00:27ff:fe7b:6a3f/64 scope link
       valid_lft forever preferred_lft forever
=> OK


Check the log file:

[root@ol6a ~]# more /home/tom/vip.txt
down:
Sat Feb 21 13:24:44 CET 2015
up:
Sat Feb 21 13:25:22 CET 2015

=> OK


Start the ucarp service on the second machine:

[root@ol6b ~]# service ucarp start
Starting common address redundancy protocol daemon:        [  OK  ]


Check the IP config:

[root@ol6b ~]# ip addr sh eth0
2: eth0: <BROADCAST,MULTICAST,UP,LOWER_UP> mtu 1500 qdisc pfifo_fast state UP qlen 1000
    link/ether 08:00:27:d1:09:96 brd ff:ff:ff:ff:ff:ff
    inet 192.168.56.122/24 brd 192.168.56.255 scope global eth0
    inet6 fe80::a00:27ff:fed1:996/64 scope link
       valid_lft forever preferred_lft forever

=> OK, the VIP is not active


Check the log file:

[root@ol6b ~]# more /home/tom/vip.txt
down:
Sat Feb 21 13:25:49 CET 2015


(10)
Stop the ucarp service on the first machine.

[root@ol6a ~]# service ucarp stop
Stopping common address redundancy protocol daemon:        [  OK  ]
There is a new “down” entry in the logfile:
[root@ol6a ~]# more /home/tom/vip.txt
down:
Sat Feb 21 13:15:17 CET 2015
up:
Sat Feb 21 13:15:55 CET 2015
down:
Sat Feb 21 13:20:43 CET 2015


On the second machine, check the IP config:

[root@ol6b ~]# ip addr sh eth0
2: eth0: <BROADCAST,MULTICAST,UP,LOWER_UP> mtu 1500 qdisc pfifo_fast state UP qlen 1000
    link/ether 08:00:27:d1:09:96 brd ff:ff:ff:ff:ff:ff
    inet 192.168.56.122/24 brd 192.168.56.255 scope global eth0
    inet 192.168.56.120/24 scope global secondary eth0
    inet6 fe80::a00:27ff:fed1:996/64 scope link
       valid_lft forever preferred_lft forever

=> OK, the VIP is active


Check also the log file:

[root@ol6b ~]# tail -f /home/tom/vip.txt
down:
Sat Feb 21 13:25:49 CET 2015
up:
Sat Feb 21 13:28:52 CET 2015

=> OK


Final Installation / Configuration steps on both machines

Make the ucarp service autostartable:

# chkconfig ucarp on


Bugfixing

I implemented this utility in a VMWare environment, but when launching the ucarp service on multiple machines, the VIP became active on all the hosts...
That was not really what I expected.
When checking my configs, everything seemed to be fine.
After a search, I found out that the problem was located in the settings of the VLAN where the VM's were running.
On the VLAN, I had to change some settings.

Situation before:


After the change:


Thereafter, the UCarp setup worked perfectly!

Thursday, February 12, 2015

Storing your Reports jobs queue in the database

If you want to have a better look into your reports queue, you can store as well all your reports jobs into a database, e.g. your database where your application is running on.

(1)
Create a database schema with the necessary system grants.
Connect to the database with this new user and execute this script:
$ORACLE_HOME/reports/admin/sql/rw_server.sql

(2)
Now, we have to create a credential key for the just created user.
In the EM, select your domain.  In the dropdown menu, go to "Security" - "Credentials".
Select the reports item and click on "Create Key".
Please give in your data.  Choose a clear key name like "repo".

(3)
In the EM, go to the "Advanced Configuration" section of the reports application on your reports managed server.  Go to the "Job Status Repository" section, activate "Enable Job Status Repository DB" and give in the credentials of your database user.  As password key, you don't have to specify the password of the database user, but a string that contains your key map: "csf:reports:repo".
Apply your changes and restart the WLS_REPORTS managed server.

Note: you also have a "Job Repository" section.  This must be used when you run your reports in a HA environment with a reports cluster.

(4)
When the reports server is back up and running, try to execute a report.
Afterwards, you should see a new entry in the "showjobs" page.  In the database table RW_SERVER_JOB_QUEUE you should see this entry as well.
In the database package RW_SERVER you will find the following functions:
* insert_job : create a reports job
* remove_job : remove a particular job
* clean_up_queue : to remove all the jobs from the queue
Important to know: removing records in this table will not result in a modification in the <<reports>>.dat file, and thus not into a change in the showjobs page as well.

Secure your Reports showjobs page

When you run your reports, you can afterwards check your executed reports through the "showjobs" page:
http://hostname:port/reports/rwservlet/showjobs
By default, the info on this page is not secured, what means that everybody who navigates to this page can see the executed reports.  In some business environments where user security is an important issue, this could be a serious problem.
But fortunately, we can easily overrule this lack of security.

(1)
In the EM, go to the "Advanced Configuration" section of the reports application on your reports managed server.
In the "Reports Security" block, normally the value of "Web Command Access Level" is "None".  You'll have to change this to "L1".
Apply your changes.

(2)
The rwserver.conf file must be modified (path = $DOMAIN_HOME/config/fmwconfig/servers/WLS_REPORTS/applications/reports_11.1.2/configuration/rwserver.conf).
First backup this file.
Open the file and locate the following lines (normally at the end of the file):
    <queue maxQueueSize="1000"/>
    <pluginParam value="%MAILSERVER_NAME%" name="mailServer"/>
Between these 2 lines, add this line:
    <identifier encrypted="no">$USER/$PASSWORD</identifier>
E.g.:
    <identifier encrypted="no">tom/tom123</identifier>
Save the file and restart your WLS_REPORTS managed server.
When navigating now to the showjobs page, you will see this error in the web page:
REP-52262: Diagnostic output is disabled.
You will notice that your credentials in the rwserver.conf file will be encrypted, e.g.:
   <identifier encrypted="yes">QQxdV12tLRTWlg==</identifier>

To see back the reports queue, you'll have to add the authid parameter to your url:
http://hostname:port/reports/rwservlet/showjobs?authid=$USERNAME/$PASSWORD

Reports showjobs : decreasing the size of the queue

The default maximum size of the reports queue is 1000.
This value can be retrieved from the rwserver.conf file (path = $DOMAIN_HOME/config/fmwconfig/servers/WLS_REPORTS/applications/reports_11.1.2/configuration/rwserver.conf):
    <queue maxQueueSize="1000"/>


You can define a lower value for this parameter.

If you specify for example the value 5, you will see (after a server restart) that the engine reorganizes the queue en will keep only the last 5 reports.
On the file system, you will see also only the last 5 reports in the cache directory:
$INSTANCE_HOME/reports/cache

JMS - Store-And-Forward

As the concept of message bridges is specially designed for communication with other JMS implementations, WebLogic Server offers us Store-And-Forward (SAF) to establish JMS communication between recent WLS versions.

Compared with JMS bridges, the practical implementation of SAF is a little bit different.

The SAF-architecture looks like this:


First, we configure the target domain.
This is quite straight forward.  Define a JMS server, a JMS module with a connection factory and a queue.

The source configuration is different.

  • You need a JMS server as well.
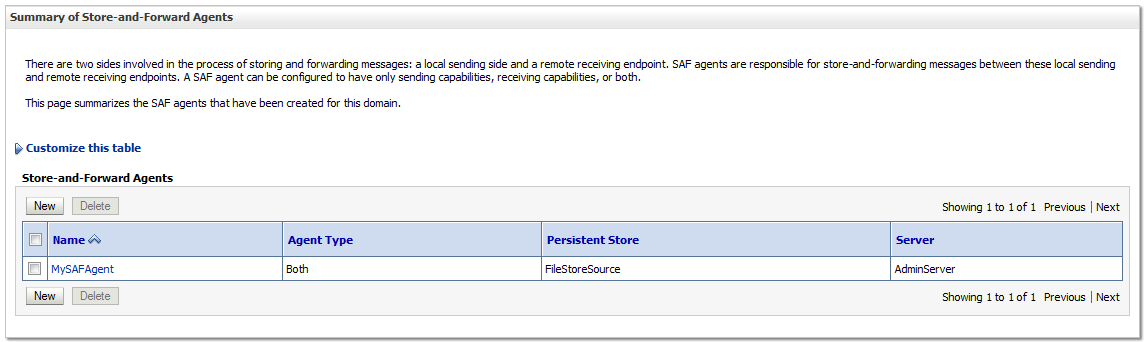
  • You'll need to create a "Store-And-Forward Agent" connected with a persistent store.
  • A "Connection Factory" must be configured.
  • The queue doesn't have to configured in the system module directly.
  • A "SAF Remote Context" needs to be created; there we will define the t3 connection url.
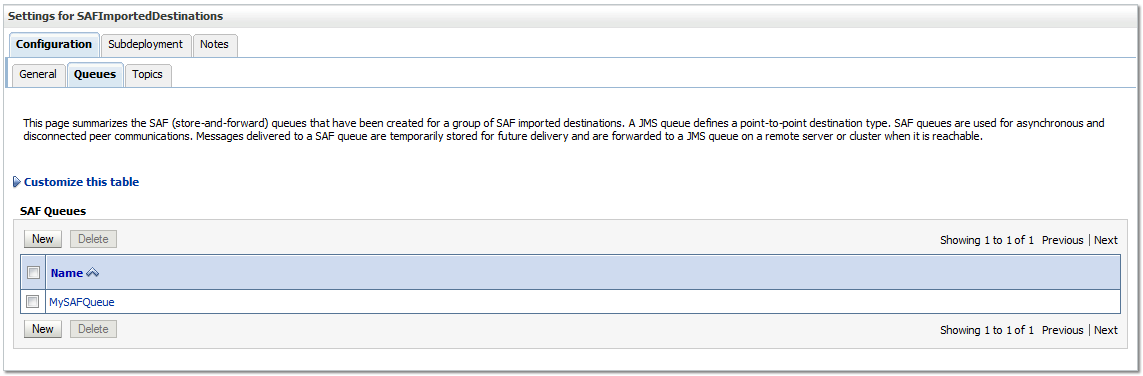
  • As last component, a "SAF Imported Destination" must be configured.  In that component, we'll make a queue that points to the target queue.

SAF Agent:

The components of the system module:


The SAF Remote Context:


The SAF Imported Destination:


The SAF Queue within the imported destination:


When the architecture is completely configured, we can now test our setup.
In a small web application, we send messages to the source queue:

And the output on our target queue looks like this:

[oracle@wls12c2 jms]$ java SAFQueueTargetReceive t3://wls12c2:8011
JMS Ready To Receive Messages (To quit, send a "quit" message).
Text Message Received: this is a test message 0
Text Message Received: this is a test message 1
Text Message Received: this is a test message 2
Text Message Received: this is a test message 3
Text Message Received: this is a test message 4
Text Message Received: this is a test message 5
Text Message Received: this is a test message 6
Text Message Received: this is a test message 7
Text Message Received: this is a test message 8
Text Message Received: this is a test message 9


Conclusion: our SAF configuration works like a charm!

JMS - Message Bridge

The message bridge in WebLogic is nice if you want to have communications between several JMS implementations, e.g.

  • different WebLogic Server versions
  • WebLogic and other JMS implementations (JBoss, GlassFish,...)
For this demo purpose, I will define message bridges between two WLS 12c domains.  I know that this setup is not the right one to demonstrate message bridges because therefore you'll have to use the Store-And-Forward (SAF) feature.
I will show the SAF feature in one of my following blog posts.

But to show you the architecture and implementation, I guess it is a good example.

This is the architecture of my setup:


On both domains, a JMS server must be created, a JMS module which contains a "Connection Factory" and a "Queue".

Source domain:


Target domain:


In the source domain, 2 "JMS Bridge Destinations" must be created and 1 overarching brigde:


The destination for the source:


The destination for the target:


And the combination of the 2 destinations:


From this moment (= creation of the bridge itself), WLS deploys automatically the correct resource adapter:


Now, we can test our setup.
I wrote a small web application that I deployed in the source domain (port 8001) to send messages to the source queue:


And I wrote a Java class that listens on the target queue deployed in the target domain.  If I push on the "Send Message" button in my web application, I see this output on my listener:

[oracle@wls12c2 jms]$ java QueueTargetReceive t3://wls12c2:8011
JMS Ready To Receive Messages (To quit, send a "quit" message).
Text Message Received: this is a test message 0
Text Message Received: this is a test message 1
Text Message Received: this is a test message 2
Text Message Received: this is a test message 3
Text Message Received: this is a test message 4
Text Message Received: this is a test message 5
Text Message Received: this is a test message 6
Text Message Received: this is a test message 7
Text Message Received: this is a test message 8
Text Message Received: this is a test message 9


Conclusion: my setup works successfully!