If you want to have a better look into your reports queue, you can store as well all your reports jobs into a database, e.g. your database where your application is running on.
(1)
Create a database schema with the necessary system grants.
Connect to the database with this new user and execute this script:
$ORACLE_HOME/reports/admin/sql/rw_server.sql
(2)
Now, we have to create a credential key for the just created user.
In the EM, select your domain. In the dropdown menu, go to "Security" - "Credentials".
Select the reports item and click on "Create Key".
Please give in your data. Choose a clear key name like "repo".
(3)
In the EM, go to the "Advanced Configuration" section of the reports application on your reports managed server. Go to the "Job Status Repository" section, activate "Enable Job Status Repository DB" and give in the credentials of your database user. As password key, you don't have to specify the password of the database user, but a string that contains your key map: "csf:reports:repo".
Apply your changes and restart the WLS_REPORTS managed server.
Note: you also have a "Job Repository" section. This must be used when you run your reports in a HA environment with a reports cluster.
(4)
When the reports server is back up and running, try to execute a report.
Afterwards, you should see a new entry in the "showjobs" page. In the database table RW_SERVER_JOB_QUEUE you should see this entry as well.
In the database package RW_SERVER you will find the following functions:
* insert_job : create a reports job
* remove_job : remove a particular job
* clean_up_queue : to remove all the jobs from the queue
Important to know: removing records in this table will not result in a modification in the <<reports>>.dat file, and thus not into a change in the showjobs page as well.
Thursday, February 12, 2015
Secure your Reports showjobs page
When you run your reports, you can afterwards check your executed reports through the "showjobs" page:
http://hostname:port/reports/rwservlet/showjobs
By default, the info on this page is not secured, what means that everybody who navigates to this page can see the executed reports. In some business environments where user security is an important issue, this could be a serious problem.
But fortunately, we can easily overrule this lack of security.
(1)
In the EM, go to the "Advanced Configuration" section of the reports application on your reports managed server.
In the "Reports Security" block, normally the value of "Web Command Access Level" is "None". You'll have to change this to "L1".
Apply your changes.
(2)
The rwserver.conf file must be modified (path = $DOMAIN_HOME/config/fmwconfig/servers/WLS_REPORTS/applications/reports_11.1.2/configuration/rwserver.conf).
First backup this file.
Open the file and locate the following lines (normally at the end of the file):
<queue maxQueueSize="1000"/>
<pluginParam value="%MAILSERVER_NAME%" name="mailServer"/>
Between these 2 lines, add this line:
<identifier encrypted="no">$USER/$PASSWORD</identifier>
E.g.:
<identifier encrypted="no">tom/tom123</identifier>
Save the file and restart your WLS_REPORTS managed server.
When navigating now to the showjobs page, you will see this error in the web page:
REP-52262: Diagnostic output is disabled.
You will notice that your credentials in the rwserver.conf file will be encrypted, e.g.:
<identifier encrypted="yes">QQxdV12tLRTWlg==</identifier>
To see back the reports queue, you'll have to add the authid parameter to your url:
http://hostname:port/reports/rwservlet/showjobs?authid=$USERNAME/$PASSWORD
Reports showjobs : decreasing the size of the queue
The default maximum size of the reports queue is 1000.
This value can be retrieved from the rwserver.conf file (path = $DOMAIN_HOME/config/fmwconfig/servers/WLS_REPORTS/applications/reports_11.1.2/configuration/rwserver.conf):
<queue maxQueueSize="1000"/>
This value can be retrieved from the rwserver.conf file (path = $DOMAIN_HOME/config/fmwconfig/servers/WLS_REPORTS/applications/reports_11.1.2/configuration/rwserver.conf):
<queue maxQueueSize="1000"/>
You can define a lower value for this parameter.
If you specify for example the value 5, you will see (after a server restart) that the engine reorganizes the queue en will keep only the last 5 reports.
On the file system, you will see also only the last 5 reports in the cache directory:
$INSTANCE_HOME/reports/cache
JMS - Store-And-Forward
As the concept of message bridges is specially designed for communication with other JMS implementations, WebLogic Server offers us Store-And-Forward (SAF) to establish JMS communication between recent WLS versions.
Compared with JMS bridges, the practical implementation of SAF is a little bit different.
The SAF-architecture looks like this:

First, we configure the target domain.
This is quite straight forward. Define a JMS server, a JMS module with a connection factory and a queue.
The source configuration is different.


When the architecture is completely configured, we can now test our setup.

Compared with JMS bridges, the practical implementation of SAF is a little bit different.
The SAF-architecture looks like this:
First, we configure the target domain.
This is quite straight forward. Define a JMS server, a JMS module with a connection factory and a queue.
The source configuration is different.
- You need a JMS server as well.
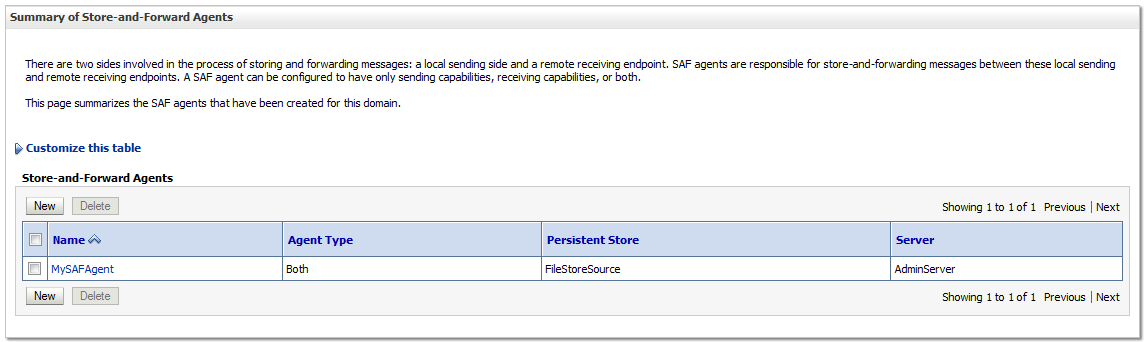
- You'll need to create a "Store-And-Forward Agent" connected with a persistent store.
- A "Connection Factory" must be configured.
- The queue doesn't have to configured in the system module directly.
- A "SAF Remote Context" needs to be created; there we will define the t3 connection url.
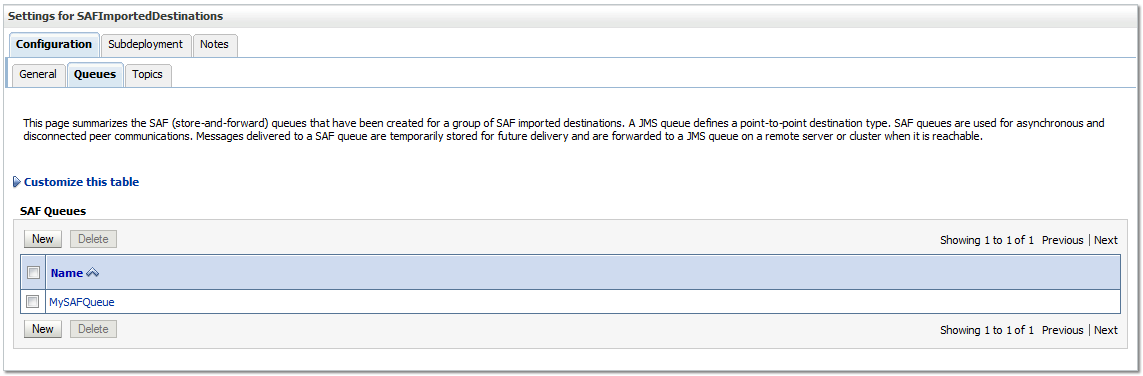
- As last component, a "SAF Imported Destination" must be configured. In that component, we'll make a queue that points to the target queue.
SAF Agent:
The components of the system module:
The SAF Remote Context:
The SAF Imported Destination:
The SAF Queue within the imported destination:
In a small web application, we send messages to the source queue:
And the output on our target queue looks like this:
[oracle@wls12c2 jms]$ java SAFQueueTargetReceive t3://wls12c2:8011
JMS Ready To Receive Messages (To quit, send a "quit" message).
Text Message Received: this is a test message 0
Text Message Received: this is a test message 1
Text Message Received: this is a test message 2
Text Message Received: this is a test message 3
Text Message Received: this is a test message 4
Text Message Received: this is a test message 5
Text Message Received: this is a test message 6
Text Message Received: this is a test message 7
Text Message Received: this is a test message 8
Text Message Received: this is a test message 9
Conclusion: our SAF configuration works like a charm!
JMS - Message Bridge
The message bridge in WebLogic is nice if you want to have communications between several JMS implementations, e.g.
But to show you the architecture and implementation, I guess it is a good example.
This is the architecture of my setup:

On both domains, a JMS server must be created, a JMS module which contains a "Connection Factory" and a "Queue".
Source domain:

Target domain:

In the source domain, 2 "JMS Bridge Destinations" must be created and 1 overarching brigde:

The destination for the source:

The destination for the target:

And the combination of the 2 destinations:

From this moment (= creation of the bridge itself), WLS deploys automatically the correct resource adapter:

Now, we can test our setup.
I wrote a small web application that I deployed in the source domain (port 8001) to send messages to the source queue:

And I wrote a Java class that listens on the target queue deployed in the target domain. If I push on the "Send Message" button in my web application, I see this output on my listener:
[oracle@wls12c2 jms]$ java QueueTargetReceive t3://wls12c2:8011
JMS Ready To Receive Messages (To quit, send a "quit" message).
Text Message Received: this is a test message 0
Text Message Received: this is a test message 1
Text Message Received: this is a test message 2
Text Message Received: this is a test message 3
Text Message Received: this is a test message 4
Text Message Received: this is a test message 5
Text Message Received: this is a test message 6
Text Message Received: this is a test message 7
Text Message Received: this is a test message 8
Text Message Received: this is a test message 9
- different WebLogic Server versions
- WebLogic and other JMS implementations (JBoss, GlassFish,...)
For this demo purpose, I will define message bridges between two WLS 12c domains. I know that this setup is not the right one to demonstrate message bridges because therefore you'll have to use the Store-And-Forward (SAF) feature.
I will show the SAF feature in one of my following blog posts.
But to show you the architecture and implementation, I guess it is a good example.
This is the architecture of my setup:
On both domains, a JMS server must be created, a JMS module which contains a "Connection Factory" and a "Queue".
Source domain:
Target domain:
In the source domain, 2 "JMS Bridge Destinations" must be created and 1 overarching brigde:
The destination for the source:
The destination for the target:
And the combination of the 2 destinations:
From this moment (= creation of the bridge itself), WLS deploys automatically the correct resource adapter:
Now, we can test our setup.
I wrote a small web application that I deployed in the source domain (port 8001) to send messages to the source queue:
And I wrote a Java class that listens on the target queue deployed in the target domain. If I push on the "Send Message" button in my web application, I see this output on my listener:
[oracle@wls12c2 jms]$ java QueueTargetReceive t3://wls12c2:8011
JMS Ready To Receive Messages (To quit, send a "quit" message).
Text Message Received: this is a test message 0
Text Message Received: this is a test message 1
Text Message Received: this is a test message 2
Text Message Received: this is a test message 3
Text Message Received: this is a test message 4
Text Message Received: this is a test message 5
Text Message Received: this is a test message 6
Text Message Received: this is a test message 7
Text Message Received: this is a test message 8
Text Message Received: this is a test message 9
Conclusion: my setup works successfully!
WebLogic 12c : Dynamic Clusters
Oracle introduced a new interesting feature in WebLogic release 12.1.2: dynamic clusters. With this option you can easily roll out new clusters and scale them out.
In this blog post, I will try to describe this new feature.
Starting point:
WebLogic development domain "dynamic_domain" with the admin server running on port 7001.
Domain is located on 1 machine where the NM is running on.
Navigate to the WLS console and go to the clusters section.
Choose for "New - Dynamic Cluster":

Choose an appropriate name for the cluster, e.g. "MyDynamicCluster".
In the next step, you can define a number of dynamic servers and a server name prefix. I keep the defaults here:

Next, you can choose the machines for the managed servers. Because I have only one machine, I keep the default here.

Next, you can define the listen ports for the servers; you have the choice between unique and fixed listen ports. I keep the default unique value.

The last screen shows an overview.

Terminating this wizard results in the following:
(1)
Of course, the cluster itself: "MyDynamicCluster".
(2)
A server template called "MyDynamicCluster-Template". Afterwards, you can change the settings of it.

(3)
Two automatically created managed servers.
 Both servers can be started in the console through the NM.
When you go into the dynamic cluster, and navigate then to the "Configuration - Servers" tab, you can see the 2 created servers. Also, you have the possibility to change some parameters of the dynamic cluster.

For example, if you modify the "Maximum Number of Servers" from 2 to 3, WLS will automatically create a third server for you.
When all servers of the dynamic cluster are down, you can delete the cluster. If at least one server is still running, you'll get an error and you are not able to delete the cluster.
After the cluster has been deleted, you'll notify that the managed servers are deleted as well. The server template still exists, but has of course no more a link with the cluster.
In this blog post, I will try to describe this new feature.
Starting point:
WebLogic development domain "dynamic_domain" with the admin server running on port 7001.
Domain is located on 1 machine where the NM is running on.
Navigate to the WLS console and go to the clusters section.
Choose for "New - Dynamic Cluster":
Choose an appropriate name for the cluster, e.g. "MyDynamicCluster".
In the next step, you can define a number of dynamic servers and a server name prefix. I keep the defaults here:
Next, you can choose the machines for the managed servers. Because I have only one machine, I keep the default here.
Next, you can define the listen ports for the servers; you have the choice between unique and fixed listen ports. I keep the default unique value.
The last screen shows an overview.
Terminating this wizard results in the following:
(1)
Of course, the cluster itself: "MyDynamicCluster".
(2)
A server template called "MyDynamicCluster-Template". Afterwards, you can change the settings of it.
(3)
Two automatically created managed servers.
When you go into the dynamic cluster, and navigate then to the "Configuration - Servers" tab, you can see the 2 created servers. Also, you have the possibility to change some parameters of the dynamic cluster.
For example, if you modify the "Maximum Number of Servers" from 2 to 3, WLS will automatically create a third server for you.
When all servers of the dynamic cluster are down, you can delete the cluster. If at least one server is still running, you'll get an error and you are not able to delete the cluster.
After the cluster has been deleted, you'll notify that the managed servers are deleted as well. The server template still exists, but has of course no more a link with the cluster.
Node Manager : High Availability & Crash Recovery
If you want to have a highly available WLS-environment, it is a very good practice to use the Node Manager (NM). I have done some tests and I will share here my findings.
Note:
This blog post just focuses on the recovery aspects of the Node Manager and will not handle the basic issues.
On a Linux machine, I created a domain with the following components:
Conclusion:
It is a good practice to start automatically the NM when booting the server machine. This will bring automatically the servers under the NM-control in the original state. That means, if your server process was down, when your machine crashed, it will not be recovered. If it was up and running, NM will restart your process.
Note:
This blog post just focuses on the recovery aspects of the Node Manager and will not handle the basic issues.
On a Linux machine, I created a domain with the following components:
- AdminServer : started through the "startWebLogic.sh" script
- One single machine + NM configuration : NM started through the "startNodeManager.sh" script
- One managed server : started through the NM in the console
Search the process id of the managed server through the command line, and execute the following command:
kill <<pid_managed_server>>
Result:
No automatically restart of the managed server.
I restarted the server through the WLS console, and I executed this command:
kill -9 <<pid_managed_server>>
Result:
Auto-restart of the managed server OK!
I did a cold restart of the server machine, and after the reboot, I started back the NM.
Result:
No automatically restart of the managed server. I restarted manually the server through the WLS console.
To solve this (= enable the crash recovery), the parameter "CrashRecoveryEnabled" must be changed from "false" to "true" in the file "$WL_HOME/common/nodemanager/nodemanager.properties". Thereafter, restart the NM.
Now, again I did a cold restart of the server machine, started back the NM.
Result:
Auto-restart (= recovery) of the managed server OK!
Conclusion:
It is a good practice to start automatically the NM when booting the server machine. This will bring automatically the servers under the NM-control in the original state. That means, if your server process was down, when your machine crashed, it will not be recovered. If it was up and running, NM will restart your process.
Generating your WLS-domain to a WLST-script through configToScript
If you want to generate a WLST-script from your domain, you can use the configToScript WLST-command.
To solve this, go to the $JAVA_HOME/jre/lib directory and create the "endorsed" directory, if not exists.
Copy the jars in the $WL_HOME/endorsed directory to this new directory.
Now try again to run the Jython script in WLST. If successful, you can start up your environment.
I noticed afterwards that my application was not deployed, so I redeployed it with WLST.
This command has 4 optional parameters:
- configPath : your domain directory; if null, your current directory will be taken
- pyPath : the directory where the script files will be generated
- overwrite : if the script already exists, it will be overwritten
- propertiesFile : path to the properties file of the script
- createDeploymentScript : boolean that indicates if a script will be generated to redeploy the applications in the domain (default value = false)
wls:/offline> configToScript('/opt/oracle/Oracle/Middleware/user_projects/domains/base_domain/','/home/oracle/wlst_scripts','true','/home/oracle/wlst_scripts/base_domain.properties','true')
configToScript is loading configuration from /opt/oracle/Oracle/Middleware/user_projects/domains/base_domain/config/config.xml ...
Completed configuration load, now converting resources to wlst script...
Creating the key file can reduce the security of your system if it is not kept in a secured location after it is created. Creating new key...
Using existing user key file...
Using existing user key file...
Using existing user key file...
Using existing user key file...
Using existing user key file...
Using existing user key file...
Using existing user key file...
Using existing user key file...
configToScript completed successfully The WLST script is written to /home/oracle/wlst_scripts/config.py and the properties file associated with this script is written to /home/oracle/wlst_scripts/base_domain.properties
WLST found encrypted passwords in the domain configuration.
These passwords are stored encrypted in /home/oracle/wlst_scripts/c2sConfigbase_domain
and /home/oracle/wlst_scripts/c2sSecretbase_domain. WLST will use these password values
while the script is run.
wls:/offline> exit()
Exiting WebLogic Scripting Tool.
After this, you can verify the created files:
[oracle@wls12c wlst_scripts]$ pwd
/home/oracle/wlst_scripts
[oracle@wls12c wlst_scripts]$ ls
base_domain.properties c2sSecretbase_domain deploy.py
c2sConfigbase_domain config.py
Optionally, open the base_domain.properties file and modify the value of the domainDir parameter.
Optionally, open the base_domain.properties file and modify the value of the domainDir parameter.
Now, we will recreate the domain with the scripts.
Therefore, we first backup and then delete the WLS-domain directory. Also, it is a good advice to backup your application sources.
Then, we can execute the config.py script through WLST.
Then, we can execute the config.py script through WLST.
Normally, during the first run, you will encounter this error:
Exception in thread "Main Thread" java.lang.AssertionError: JAX-WS 2.2 API is required, but an older version was found in the JDK.
Exception in thread "Main Thread" java.lang.AssertionError: JAX-WS 2.2 API is required, but an older version was found in the JDK.
To solve this, go to the $JAVA_HOME/jre/lib directory and create the "endorsed" directory, if not exists.
Copy the jars in the $WL_HOME/endorsed directory to this new directory.
Now try again to run the Jython script in WLST. If successful, you can start up your environment.
I noticed afterwards that my application was not deployed, so I redeployed it with WLST.
Deassociating OID from Reports 11g
At a customer site, I faced this problem when trying to activate the showjobs-url of the reports server.
The installation was done by someone else. On the server machine (OS: Windows Server 2008 SP2), the IDM 11g Suite was first installed and then the Fusion Middleware 11g Suite. During the configuration, they associated the OID to the Reports components.
When I arrived a few months later to do some other configuration changes, the customer wanted to deassociate the link between OID and Reports. When we did the deassociation, we received this error in the showjobs-url:
REP-52266: The in-process Reports Server rep_wls_name failed to start.oracle.reports.RWException: IDL:oracle/reports/RWException:1.0
In the rwserver_diagnostics.log file, we found these 2 errors:
* REP-50125 : An internal exception occurred: oracle.security.jps.service.credstore.CredStoreException: Could not find the key specified.
* REP-50125 : An internal exception occurred: oracle.security.jps.service.credstore.CredStoreException: JPS-01050: Opening of wallet based credential store failed. Reason java.io.IOException: PKI-02002: Unable to open the wallet. Check password.
We could solve this issue by commenting some tags:
(1) rwservlet.properties -> we commented the oidconnection-tag
(2) rwserver.conf -> we commented the security-tag
After that, we stopped our environment and restarted all the processes. Result: everything worked fine!
Forms 11g - Windows Java client hangs with message "The application's digital signature cannot be verified."
After modifying the webconfiguration values for the paremeters "webutilArchive" and "archive", I had a very annoying problem.
When I activated the application url, I got the following popup message and I couldn't accept/deny this message.
Although, there is a checkbox in the message and 2 buttons, I couldn't do anything else than shutting down my browser through the Windows Task Manager.
There are 2 solutions for this problem:
(1) Using this sequence of jar-files for webutilArchive
WebUtil Form HangsWhen Acknowledging Security Warning - The application's digital signature cannot be verified [ID 1328039.1]
(2) Applying patch 9463433 if the archive parameter is the cause of the problem
More info on Oracle Support:
Windows Java Client Hangs On Accepting Not Verified Signature Of jar Files [ID 1173365.1]
When I activated the application url, I got the following popup message and I couldn't accept/deny this message.
Warning - Security
The application's digital signature cannot be verified.
Do you want to run the application?

Name:      ...
Publisher: ...
From:      ...
[ ] Always trust content from this publisher.

[Run] [Cancel]
Although, there is a checkbox in the message and 2 buttons, I couldn't do anything else than shutting down my browser through the Windows Task Manager.
There are 2 solutions for this problem:
(1) Using this sequence of jar-files for webutilArchive
webutilArchive=jacob.jar, frmwebutil.jarMore info on Oracle Support:
WebUtil Form HangsWhen Acknowledging Security Warning - The application's digital signature cannot be verified [ID 1328039.1]
(2) Applying patch 9463433 if the archive parameter is the cause of the problem
More info on Oracle Support:
Windows Java Client Hangs On Accepting Not Verified Signature Of jar Files [ID 1173365.1]
Oracle Forms Builder 11g R2 on Oracle Linux 6
If you want to run the Forms Builder utility (by executing the $INSTANCE_HOME/bin/frmbld.sh script) on your Oracle Linux 6 system, it is possible that you receive this error:
#
# A fatal error has been detected by the Java Runtime Environment:
#
# SIGSEGV (0xb) at pc=0x00007fb7d0b1c2c3, pid=11590, tid=140427416176448
#
# JRE version: 6.0_35-b10
# Java VM: Java HotSpot(TM) 64-Bit Server VM (20.10-b01 mixed mode linux-amd64 compressed oops)
# Problematic frame:
# C [libclntsh.so.11.1+0xee72c3] __intel_new_memcpy+0x14e3
#
# An error report file with more information is saved as:
# /opt/oracle/Oracle/Middleware/asinst_1/bin/hs_err_pid11590.log
#
# If you would like to submit a bug report, please visit:
# http://java.sun.com/webapps/bugreport/crash.jsp
# The crash happened outside the Java Virtual Machine in native code.
# See problematic frame for where to report the bug.
#
That's because you forgot something during your OS preparation.
In fact, you have to set the NLS_LANG environment variable for your user, e.g. in the .bash_profile file:
export NLS_LANG=AMERICAN_AMERICA.WE8ISO8859P15
When you have this variable, you can run Forms Builder without any problem!
Wednesday, February 4, 2015
Oracle FMW 11g R2 and JDK 7 : solving OHS error in EM
Installing the OHS-component as part of Forms and/or Reports 11g R2, based on JDK 7, gives the following error in the EM, when you try to navigate to it:
Failed to invoke operation load on MBean ...

The error itself seems to be very terrible, but don't worry, you can easily solve it.
You just have to doe the following:
(1) Shutdown your OHS-component.
(2) Go to the admin.conf file located in the <<INSTANCE_HOME>>/config/OHS/<<ohs_component>> and just change this line:
SSLProtocol nzos_Version_3_0
to
SSLProtocol nzos_Version_1_0 nzos_Version_3_0
(3) Start again your OHS-component.
This error occurs both on Linux and Windows Operating Systems, the cause of the error is JDK 7, because it does not occur with earlier versions of Java.
Generated LOV-buttons in Forms
When using LOV's in your form, you would like to indicate the end users which text fields are linked with an LOV.
When you are positioned into such a text field, you can see at the status bar of the applet that the field is linked with an LOV:

To make your form more user friendly, you can add a push button with a nice icon, but you can also use automatically generated LOV-buttons. When you point the cursor in such a text field, you will see a small button with 3 dots:

It is very easy to implement this feature without doing changes in the source code of your form.
In the EM, you navigate to the Forms screen.
Next, in the "Forms" menu, you choose "Font and Icon Mapping" and you set the value for "app.ui.lovButtons" to "yes" (default = "no").

P.S.: this change will be recorded in the "registry.dat" file.
Restart your Forms server process and test the feature in your application!
When you are positioned into such a text field, you can see at the status bar of the applet that the field is linked with an LOV:
To make your form more user friendly, you can add a push button with a nice icon, but you can also use automatically generated LOV-buttons. When you point the cursor in such a text field, you will see a small button with 3 dots:
It is very easy to implement this feature without doing changes in the source code of your form.
In the EM, you navigate to the Forms screen.
Next, in the "Forms" menu, you choose "Font and Icon Mapping" and you set the value for "app.ui.lovButtons" to "yes" (default = "no").
P.S.: this change will be recorded in the "registry.dat" file.
Restart your Forms server process and test the feature in your application!
Automatic startup of WLS servers when booting Linux
On the My Oracle Support website you can find the article "RC Initialization Scripts for Starting and Stopping WebLogic Server as a UNIX Daemon [ID 877902.1]".
Here in this post, I will describe an alternative method.
I tested out on a Oracle Linux 6 host machine.
These are the steps that must/can be performed:
(1)
Create for each server within your domain a boot.properties file (My Oracle Support: "How to Start a WebLogic 10.3.x Domain AdminServer Without Interactively Supplying the Username / Password? [ID 980292.1]").
(2)
Login as root
(3)
Navigate to /etc/init.d and create a file wls with this content:
(4)
In a terminal window, execute these commands:
Here in this post, I will describe an alternative method.
I tested out on a Oracle Linux 6 host machine.
These are the steps that must/can be performed:
(1)
Create for each server within your domain a boot.properties file (My Oracle Support: "How to Start a WebLogic 10.3.x Domain AdminServer Without Interactively Supplying the Username / Password? [ID 980292.1]").
(2)
Login as root
(3)
Navigate to /etc/init.d and create a file wls with this content:
#!/bin/bash
#
# oracle Init file for starting and stopping WLS
#
# chkconfig: 35 80 30
# description: Oracle WLS startup script
# Source function library

. /etc/rc.d/init.d/functions

ORACLE_OWNER="oracle"
DOMAIN_HOME="/opt/oracle/Oracle/Middleware/user_projects/domains/dev_domain"

case "$1" in
start)
echo -n $"Starting WLS:"
su - $ORACLE_OWNER -c "$DOMAIN_HOME/bin/startWebLogic.sh > /dev/null 2>&1 &"
su - $ORACLE_OWNER -c "$DOMAIN_HOME/bin/startManagedWebLogic.sh ManagedServer1 > /dev/null 2>&1 &"
su - $ORACLE_OWNER -c "$DOMAIN_HOME/bin/startManagedWebLogic.sh ManagedServer2 > /dev/null 2>&1 &"
echo "OK"
;;
stop)
echo -n $"Stopping WLS:"
su - $ORACLE_OWNER -c "$DOMAIN_HOME/bin/stopManagedWebLogic.sh ManagedServer1"
su - $ORACLE_OWNER -c "$DOMAIN_HOME/bin/stopManagedWebLogic.sh ManagedServer2"
su - $ORACLE_OWNER -c "$DOMAIN_HOME/bin/stopWebLogic.sh"
echo "OK"
;;
*)
echo $"Usage: $0 {start|stop}"
esac
(4)
In a terminal window, execute these commands:
chmod 750 /etc/init.d/wls
chkconfig --add wls --level 0356
Subscribe to:
Posts (Atom)